Coffee Station Organizer Setup for Daily Use
Set up a coffee station organizer by placing it where the coffee machine’s water access, controls, lid or tank movement, and mug path stay clear, then load only the active daily supplies used in the normal routine. Arrange those supplies in use order—pod or filter, cup, condiments, then cleanup—and keep reserve stock nearby rather than in the active zone; the right active quantity is what you normally use before the next planned refill, not the organizer’s maximum capacity.
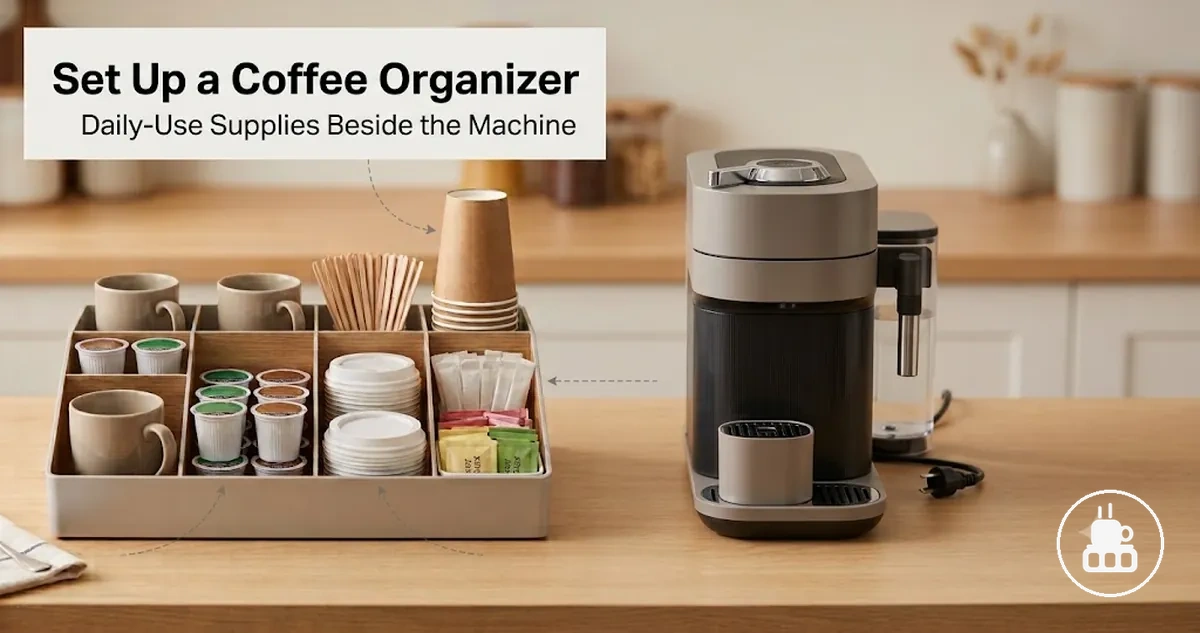
Daily setup sequence
Use these four checks in order. The goal is a station that supports a normal cup of coffee without moving the organizer or searching through reserve stock.
- 1. Fit the machine area Place the organizer only after the tank or lid can open, controls remain reachable, the mug path is clear, and the power cord is not pinched or trapped. Follow the coffee machine manufacturer’s clearance and ventilation requirements.
- 2. Set active stock Keep the supplies used before the next planned refill in the active area. Move bulk and occasional stock to nearby reserve storage instead of filling every compartment.
- 3. Match the use sequence Arrange the pod or filter first, cups next, then condiments and cleanup supplies. Keep spill-prone items stable and separate clean supplies from used items or waste.
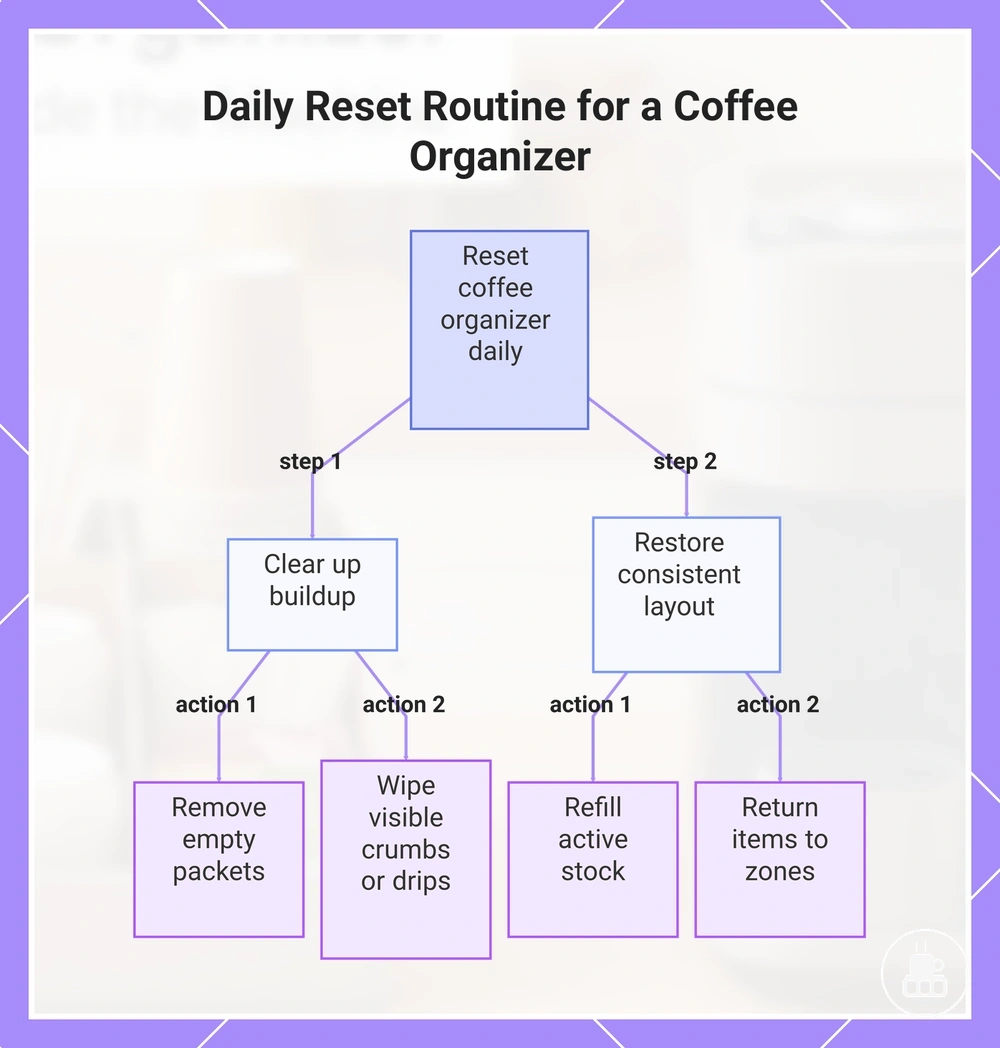
- 4. Reset after use Clear empty packets and visible drips, refill depleted active stock from reserve, and return supplies to their assigned zones so the next routine starts in the same layout.
Pass condition: you can refill, brew, pick up the mug, add the supplies you normally use, and reset the station without shifting the organizer or blocking another routine task.
Treat the station as a workflow: machine access first, active stock second, zone order third, reset last. Adjust the details for counter space, machine type, household routine, and shared use rather than trying to fill every available compartment.
Daily-use supplies and access needs for a coffee station organizer
Daily-use supplies are the coffee essentials that a coffee station organizer should keep within easy access without crowding the coffee machine. The active area should prioritize the items used most often, while less frequently used supplies can stay outside the immediate workspace.
The example below shows daily-use supplies grouped around a coffee station organizer to clarify which items belong in active reach and which can stay nearby without interrupting the counter workflow.
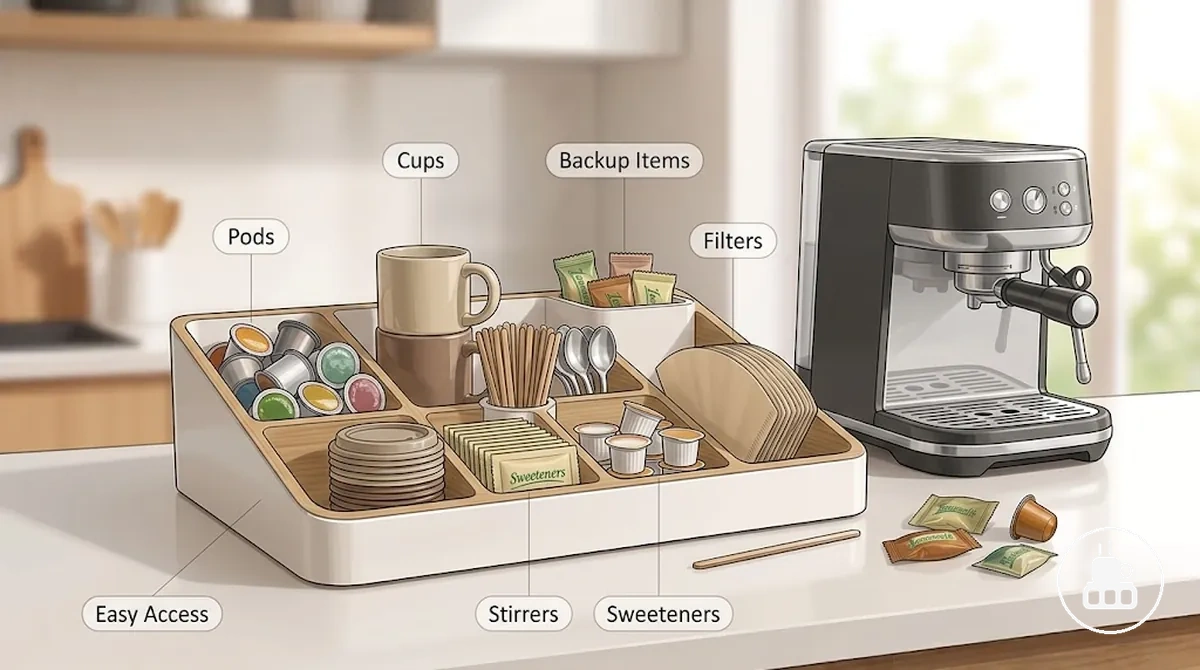
During a typical coffee routine, the main daily-use supplies can be organized as follows:
- Pods or daily filters: High access frequency when the machine uses them; keep the normal-use quantity in the highest-priority area.
- Cups: Keep the cups used in the routine close to the machine. Add lids and stirrers to the active zone only when they are routinely needed.
- Sweeteners and spoons: Group the items normally used after brewing where they can be reached without crossing the mug path.
- Creamers and backup items: Keep only shelf-stable single-serve creamers labelled for room-temperature storage in a counter organizer; refrigerated milk or cream stays chilled until use. Store lower-frequency backup supplies outside the primary daily-use zone.
Keeping active daily items separate from backup items reduces unnecessary searching and limits counter clutter. Use the amount normally needed before the next planned refill as the active-stock value; household size, machine type, and drink routine determine that amount rather than the organizer’s total capacity.
Choose the active daily zone before styling the station or comparing organizer types. For broader organization topics beyond this setup, see coffee station organizers.
Choose the counter position around the coffee machine
The organizer should sit where the coffee machine remains easy to use while daily supplies stay within comfortable reach. The right counter position depends on the coffee machine layout, counter depth, organizer footprint, and whether water access, controls, and cup pickup remain clear during daily use.
The image below shows how the organizer can be positioned beside the coffee machine to keep important access points open and support a smoother workflow before any supplies are loaded.
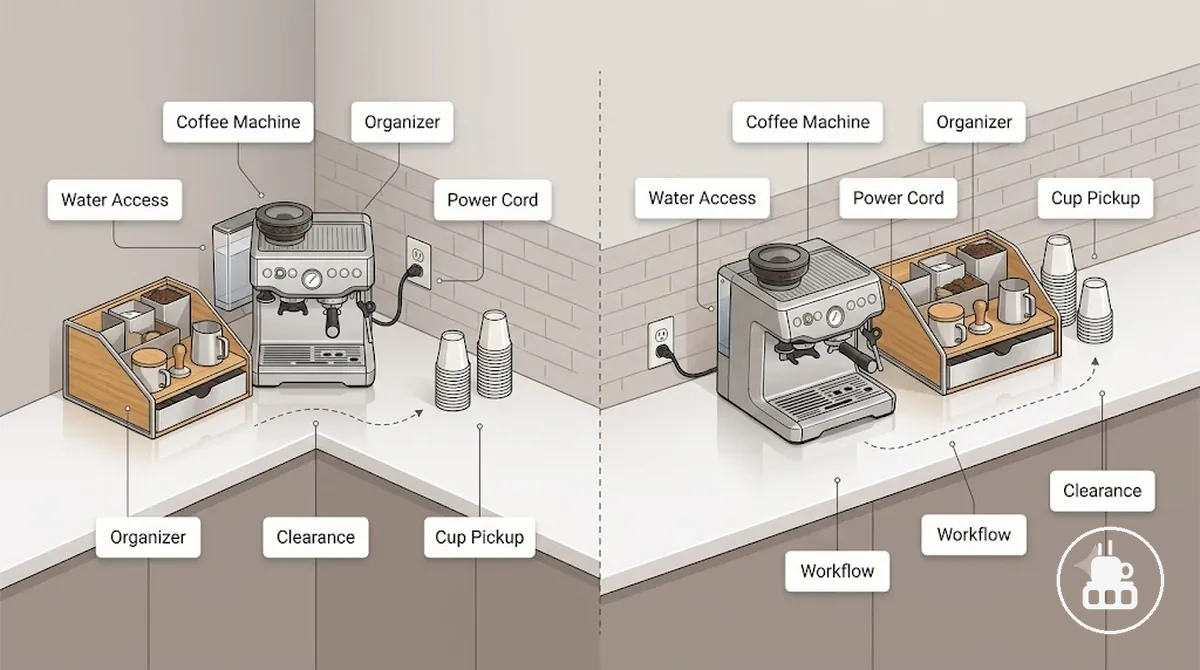
Before placing the organizer, check these conditions:
- Confirm water access stays clear so the tank can be filled or removed in its normal direction.
- Keep the power cord unobstructed; do not pinch, trap, or route it beneath the organizer.
- Maintain the manufacturer-required clearance and ventilation around the coffee machine while keeping controls reachable. Exact clearance varies by model.
- Check the mug pickup path so cups can be placed and removed without reaching across other supplies.
- Use the available counter depth without creating edge overhang or crowding the machine’s working area.
- Keep reserve storage accessible enough for refilling, but outside the primary coffee-making path.
In a compact corner setup, the organizer may work best beside the coffee machine if refills and controls remain easy to reach. On a wider counter, the organizer can often sit slightly farther away to create a more open workflow. Before finalizing the placement, compare the counter depth, organizer footprint, and machine layout to confirm fit before setup.
Keep water refills, machine controls, and cup pickup clear
Keep water refills, machine controls, and cup pickup easy to reach after placing the organizer. These access points should remain usable throughout daily use so refills, brewing, and serving are less likely to be interrupted.
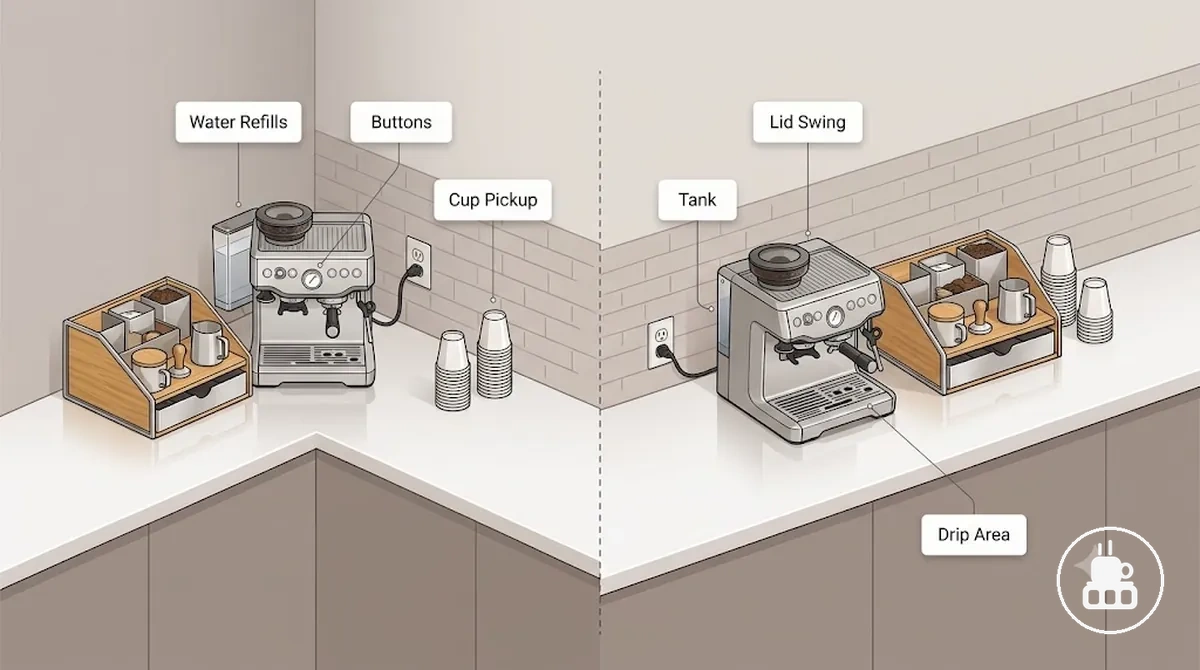
The image above labels the key machine access points. Check each area before loading supplies to reduce the chance of blocked access or unnecessary spills.
- Tank: Keep the refill path open if the tank is removed from the rear or side so water refills remain convenient.
- Lid swing: Leave enough space for the lid to open fully so filling or cleaning is not obstructed.
- Buttons: Keep machine controls visible and reachable to avoid moving the organizer during use.
- Mug path: Leave a clear path for cup pickup so mugs can be placed and removed without awkward movement.
- Drip area: Keep the drip area unobstructed so minor spills are easier to notice and clean if they occur.
Use tight counter space without blocking the coffee workflow
Tight counter space can interrupt the coffee workflow if the organizer restricts everyday movement. A compact setup works best when the organizer fits the available surface while preserving the machine’s required clearance, full drawer or cabinet movement, and enough working space for routine coffee preparation.
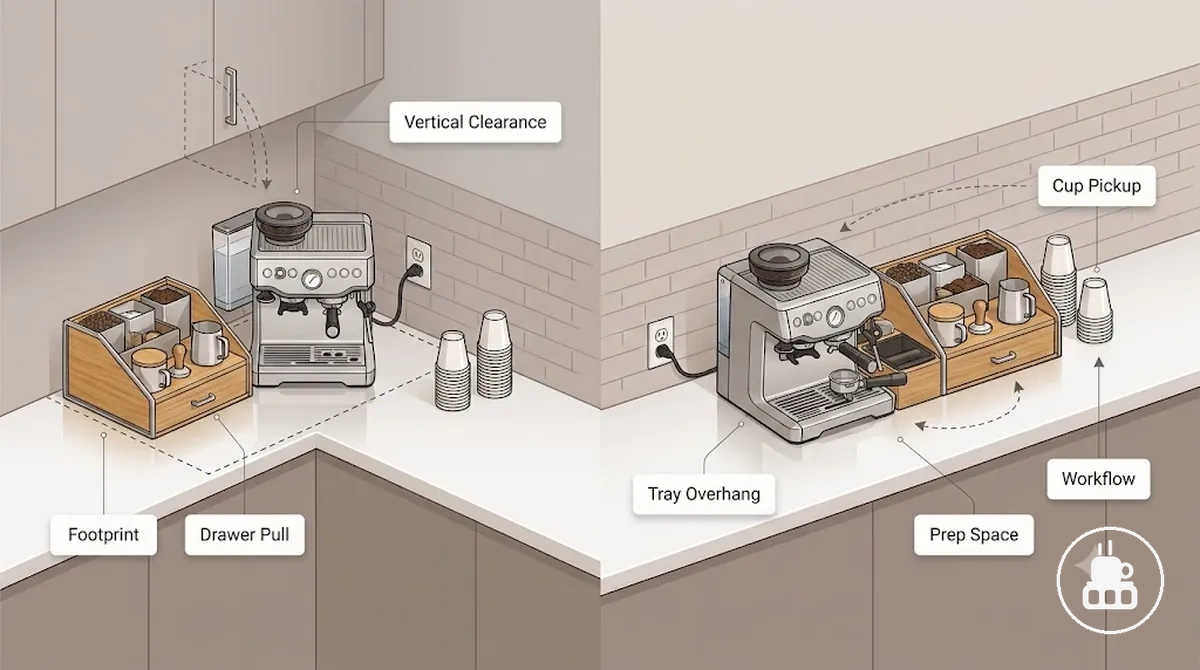
If the coffee station uses a small counter or corner setup, use the checklist below to verify that limited space still supports the coffee workflow before loading supplies.
- Footprint: Check that the organizer fits the available surface without restricting movement around the coffee area.
- Vertical clearance: Leave enough space above the organizer if shelves or cabinets could limit access.
- Drawer pull: Confirm nearby drawers can open fully without striking the organizer.
- Tray overhang: Keep trays within the counter edge so cups and accessories remain easier to reach.
- Shared prep space: Leave part of the counter available if the area is also used for other kitchen tasks.
Sort coffee supplies by use frequency before loading
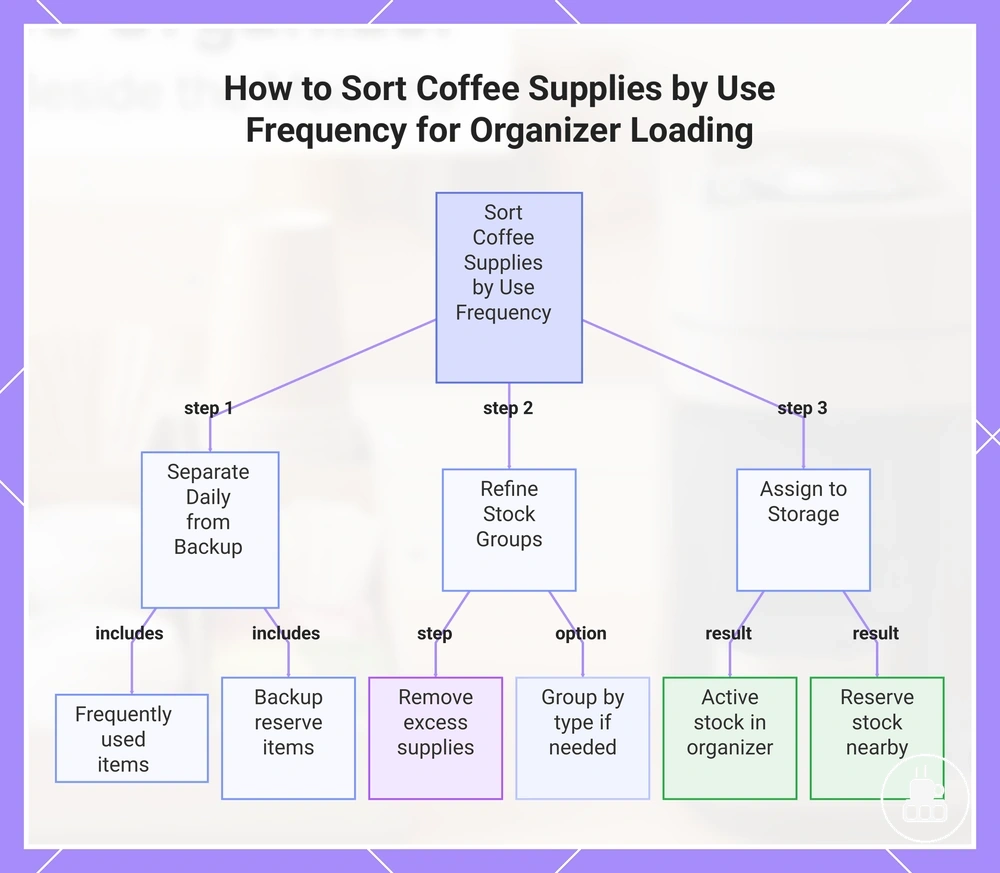
Sort coffee supplies before loading the organizer so the layout reflects daily use rather than total inventory. Use frequency should separate active stock—the amount expected before the next planned refill from reserve stock before anything is placed in the organizer.
Put frequently used pods, cups, and condiments in active stock and move occasional or bulk quantities to reserve storage. Temporarily increase active stock for a guest-ready setup only when those extra supplies are expected to be used.
Assign each group to an organizer position only after active and reserve stock are separated. For more detailed storage planning, apply the same use-frequency rule when you organize pods cups and condiments.
- Group supplies such as pods, cups, and condiments by type so each group can be assigned to active use or reserve storage.
- Separate daily items from backup stock based on use frequency, moving occasional items into reserve.
- Remove excess supplies from the active group so only items used regularly remain ready for loading.
- Assign active stock to the organizer and keep reserve supplies in nearby storage for later refills.
This chart shows the steps to separate coffee supplies into active daily items and reserve backup stock, refine the active group, and assign them to the organizer or nearby storage.
Separate daily pods, cups, lids, stirrers, sweeteners, and creamers
Separate daily pods, cups, lids, stirrers, sweeteners, and creamers by containment need before placing them in compartments. Loose packets and unlike items are easier to use when each supply group has a clear role in the daily setup.
Grouping by containment and daily quantity helps prevent small items from mixing together or pushing frequently used supplies out of reach. The exact placement can vary by routine, but the separation should keep active drink supplies visible, contained, and easy to remove.
Storage boundary: a counter organizer is suitable for dry supplies and shelf-stable single-serve condiments labelled for room-temperature storage; milk, cream, or any creamer labelled for refrigeration should remain refrigerated until use.
| Supply group | Containment need | Daily amount | Placement effect |
|---|---|---|---|
| Pods | Separate compartment or small section | Based on use frequency | Keeps coffee portions easy to identify and reach |
| Cups | Grouped area | Based on serving routine | Supports cup pickup without mixing loose items |
| Lids | Stacked or contained area | Only when takeaway or travel-cup use makes them routine | Keeps lids near cups without making an occasional item compete for prime space |
| Stirrers | Narrow container or divider | Small active quantity | Reduces scatter across the organizer |
| Sweeteners | Packet compartment or small container | Based on drink habits | Keeps packets contained and easy to remove |
| Creamers | Small grouped section for shelf-stable single-serve portions | Based on daily use; refrigerated milk or cream stays chilled | Keeps shelf-stable portions together without treating refrigerated dairy as counter storage |
Keep backup stock away from the active coffee station
Keep backup stock outside the active coffee-making zone by default. Reserve storage should replenish the station without competing with the supplies needed for the current routine.
- Active zone
- Supplies expected before the next planned refill; keep these easy to reach during coffee making.
- Reserve storage
- Extra pods, spare cups, unopened shelf-stable condiments, and bulk packets; keep them nearby but outside the working counter area when they would create clutter.
- Practical exception
- A small refill reserve can stay near the station when space allows and it does not reduce machine access, working space, or visibility of active supplies.
This chart shows the main rule for placing backup stock away from the active coffee station, the reason for this separation, and a conditional exception allowing a small reserve nearby.

Arrange organizer zones for the coffee-making sequence
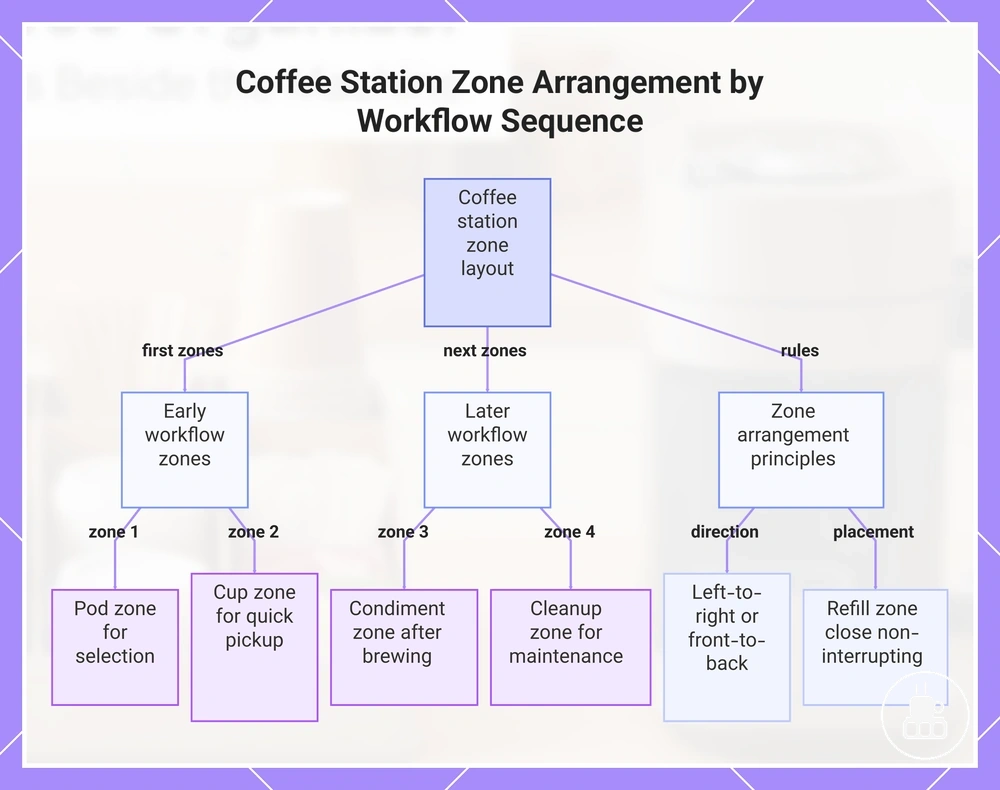
Organizer zones should follow the coffee-making sequence so each item is reached in the order it is used. The layout may run left to right or front to back, depending on the available space, but the access order should support pods, cup pickup, condiments, cleanup, refill, and spill control with minimal interruption.
Assign one purpose to each zone so reaching across the station is minimized. Compartment size and refill frequency still matter, so confirm arrange compartments and capacity before finalizing the sequence.
- Pod or filter zone: Place the coffee input used by the machine in the first easy-reach zone so selection happens before brewing.
- Cup zone: Position cups beside or immediately after the coffee-input zone so the mug path stays direct.
- Condiment zone: Keep routinely used sweeteners, shelf-stable creamers, or other add-ins after the cup zone, with spill-prone containers stable and easy to wipe around.
- Cleanup zone: Keep clean napkins or wiping supplies separate from waste; used stirrers and rubbish should not return to clean-storage compartments.
- Refill zone: Keep reserve supplies close enough for planned replenishment without interrupting the primary coffee-making sequence.
This chart shows how to organize coffee station zones in workflow order, with placement rules to minimize interruption.
Use drawers, trays, tiers, and open compartments by access need
Format choice should follow access need rather than appearance. Drawers, trays, tiers, and open compartments each support different parts of the organizer layout based on daily reach, visibility, and how often items are used.
Hidden storage keeps less frequently used supplies out of the main workspace, while visible storage keeps everyday items within daily reach. Matching hidden storage and visible storage to the intended access need helps organize supplies without treating any format as a universal solution because the right balance depends on the coffee-making routine.
| Format | Best access use |
|---|---|
| Drawers | Hidden storage for reserve supplies or small items used less often; the trade-off is reduced visibility. |
| Trays | Visible storage for frequently used supplies that benefit from quick daily reach; the trade-off is greater exposure on the counter. |
| Tiers | Grouped access when vertical space is available; the limitation depends on how easily upper and lower levels can be reached. |
| Open compartments | Visible storage for everyday items needing immediate access; the trade-off is that contents remain exposed and may require more frequent tidying. |
Contain loose packets, pods, and spill-prone items
Loose packets, pods, and spill-prone items should be contained so they are less likely to spread across the counter during normal use. Using dividers and small containers keeps related items together and makes everyday cleanup easier when minor spills or scattered packets occur.
Contain loose items before filling the remaining zones, then keep the most frequently used groups in easy reach. Match the container to the item’s physical risk—scatter, rolling, tipping, or dripping—using the guide below.
- Sugar packets: Keep them in a small container or divided section to reduce scatter and simplify cleanup.
- Stirrers and spoons: Store them upright in small containers or narrow dividers so they remain grouped instead of spreading across the organizer.
- Pods: Place pods in dedicated dividers or compartments to keep capsules contained and easy to select.
- Shelf-stable creamers: Group single-serve portions in a separate small container so they stay together and leaks are easier to isolate; keep refrigerated milk or cream chilled until use.
- Syrups: Keep syrup bottles in a stable section where minor drips can be easier to notice and clean, depending on the bottle design and how they are used.
Adjust the setup for home, guest, or shared-counter use
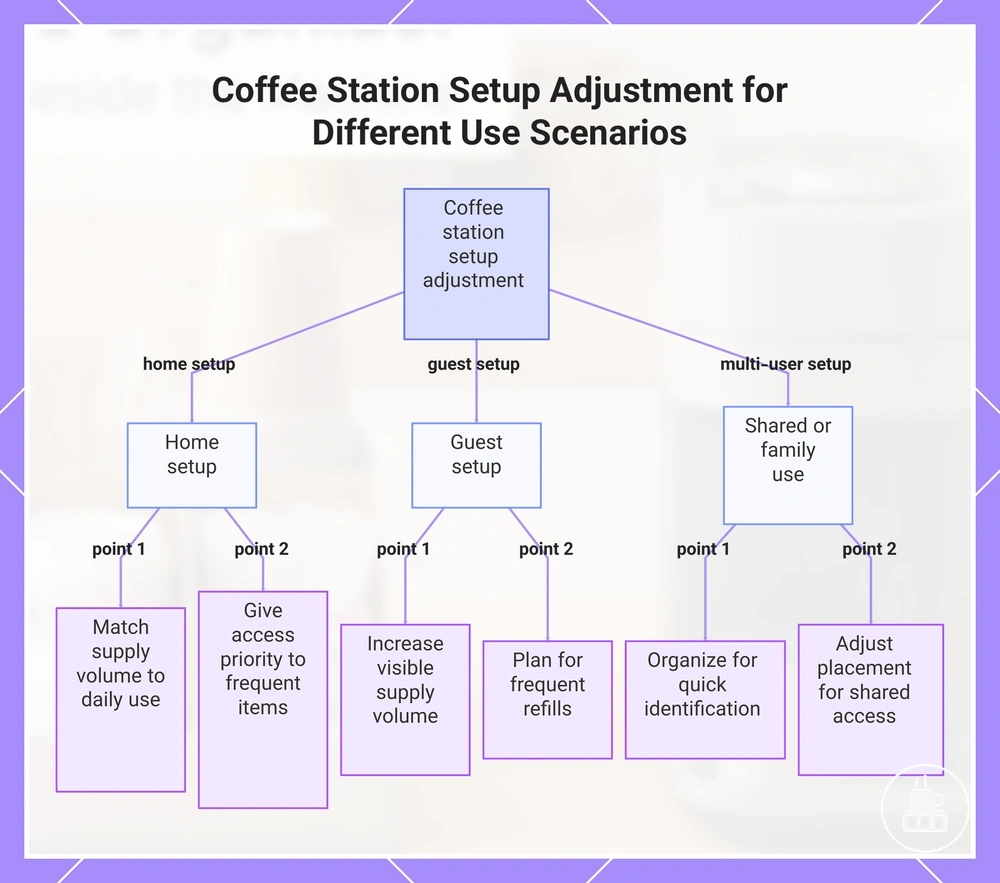
A coffee station setup should change according to how it is used. Home setup, guest setup, and shared counter arrangements differ in supply volume, visibility, refill responsibility, and access priority, even when the same organizer layout is used.
Keep the same setup logic across scenarios, but change supply volume, visibility, access priority, and refill responsibility to match expected use. Shared stations need especially clear access to common items and a predictable refill routine.
| Use scenario | Active supply volume | Visibility and access | Refill rule |
|---|---|---|---|
| Home routine | Normal-use quantity before the next planned refill | Give prime space to the household’s most frequently used supplies | Refill from reserve when active stock runs low |
| Guests expected | Temporarily increase the items likely to be used by visitors | Make cups and common condiments easy to identify without searching | Check active stock before guests arrive and replenish as needed |
| Shared counter | Keep common essentials active; move personal or occasional items out of the main path | Prioritise shared visibility and avoid layouts that require one user to move another user’s supplies | Assign refill responsibility when practical so depletion is noticed and corrected |
| Family use | Match the combined routine without filling the organizer to capacity | Place shared essentials first and separate less common preferences where possible | Use reserve storage for excess quantity and replenish the shared zone consistently |
Increase active stock only when expected use increases; do not trade machine access or working counter space for display volume. The chart below summarises how the scenarios differ.
Setup mistakes that create clutter or slow access
Most setup mistakes come from overfilling the organizer, blocked machine access, or mixed daily and backup supplies. A diagnostic checklist helps separate clutter causes from slow-access causes so each issue can be checked and adjusted without repeating the entire setup.
Use the symptom to identify the constraint: clutter usually points to excess active stock, loose-item containment, or decorative crowding, while slow access usually points to poor reach, blocked machine access, or an opening path that conflicts with the routine.
| Mistake | Symptom | Check | Likely fix |
|---|---|---|---|
| Overfilling | Clutter and crowded compartments | Check whether active supplies exceed available space. | Reduce active stock and move reserve items to nearby storage if appropriate. |
| Blocked machine access | Water refills or controls are difficult to reach | Confirm the organizer is not obstructing key access points. | Reposition the organizer to keep machine access clear. |
| Mixed supplies | Daily items are harder to locate | Check whether backup stock is stored with active supplies. | Separate daily-use items from reserve supplies. |
| Loose packets | Packets scatter across the organizer or counter | Check whether small items are stored without dividers or containers. | Use dividers or small containers to keep loose packets grouped. |
| Poor drawer direction | Workflow delays during coffee preparation | Check whether a drawer, tray, or door opens into the normal coffee-making path. | Reposition the organizer or change the opening direction when possible so access does not interrupt the routine. |
| Decorative crowding | Less working space around the coffee station | Check whether decorative items reduce access to daily supplies. | Keep decorative items secondary to the coffee-making area. |
If the matching correction does not remove the symptom and the counter is still overcrowded, the limiting factor may be available space or organizer fit rather than setup order. In that case, fix clutter and space problems before changing the organizer layout again.
Reset and maintain the organizer after daily use
A short reset after daily use keeps the coffee station organizer ready for the next routine. The reset should clear used or spilled material, replenish active stock from reserve, and restore each supply to its assigned zone.
Use this five-step reset sequence:
- Remove empty packets to keep organizer zones clear for the next use.
- Wipe away visible crumbs or drips to reduce everyday mess.
- Refill active stock when commonly used supplies run low.
- Return items to their assigned zones so the layout remains consistent.
- Check removable dividers when needed, using a cleaning method that suits the material and spill exposure.
After the daily reset, deeper cleaning depends on the organizer material, removable dividers, and spill exposure. Use the material-appropriate cleaning method and allow washable parts to dry before restocking. For additional care guidance, see clean and maintain the organizer.
The chart below groups the reset into two broader stages: clearing buildup and restoring a consistent layout.